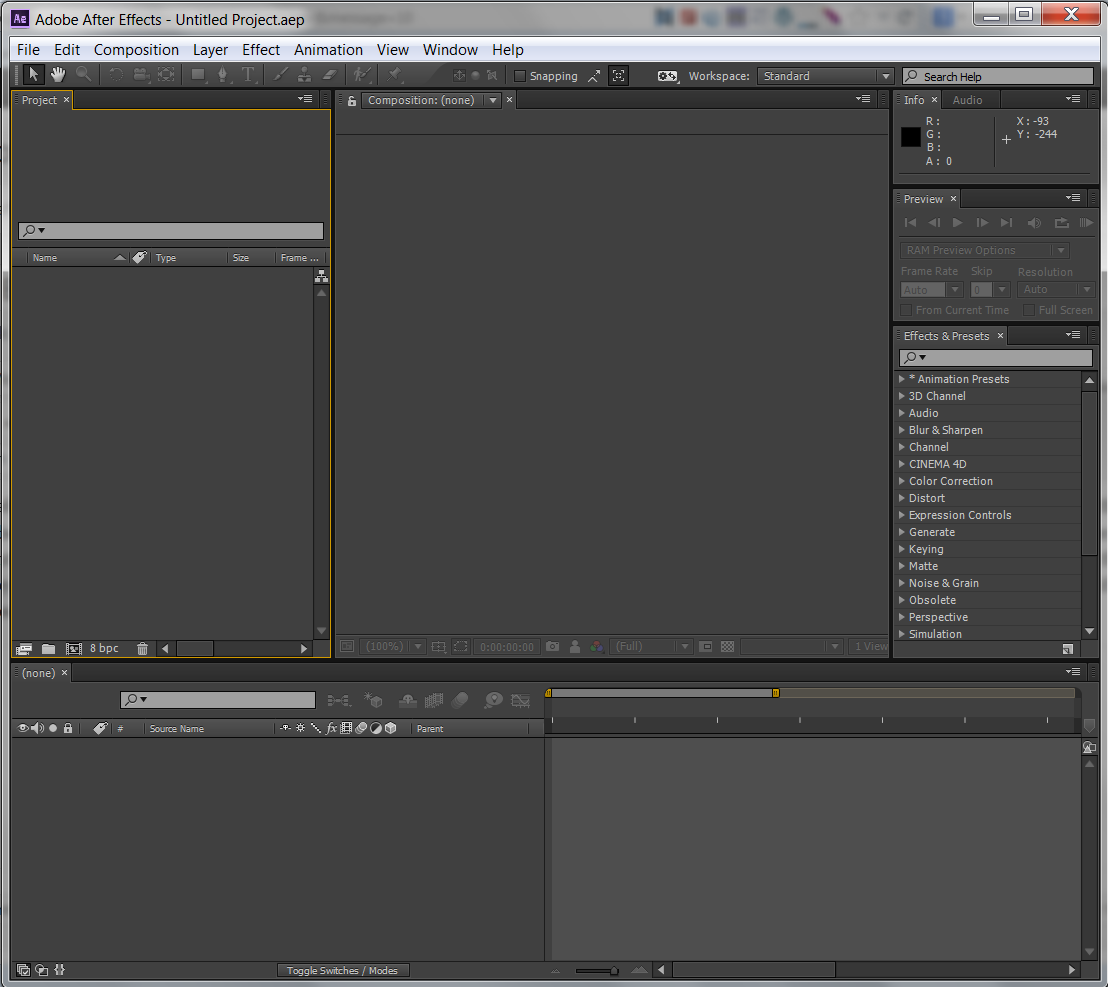
At our February Web Professionals and Adobe User Group meeting, someone asked about the fundamentals of working with Adobe After Effects. I thought it might be appropriate to create a simple animated gif (perhaps a snowstorm – since we have had so much snow this winter). I wanted to put together this documentation prior to the next meeting and use it as a starting point for discussion at the meeting. I also recently reviewed a lynda.com tutorial on this subject by my colleague and friend Tom Green. That course is Web motion for beginners: create a preloader. I recommend readers view that course if they want to learn more than I provide in this tutorial. Ok, let’s get started building a snowstorm… I am using After Effects CC for this project. When I launch it, I am presented with the following screen. The biggest issue people have with any software new to them is where to start. As you can see, there are many options, but not a lot of guidance for beginners. Yes, you can always click on the image to enlarge it. In this case, the smaller image captures my sentiments when I first used this product – ok, now what do I do?
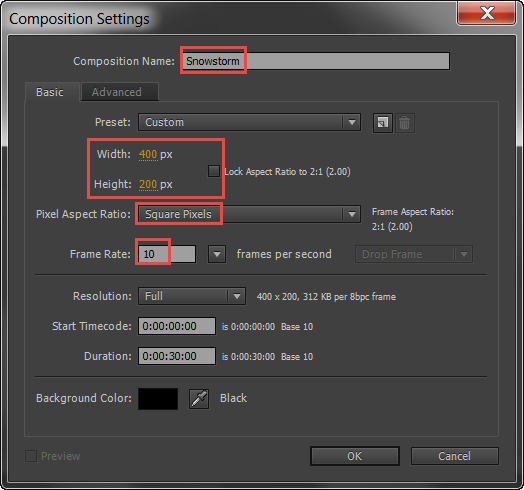
The answer is that you first need a composition. From the menu, select Composition > New composition… You next need to specify the details of your composition. As you can see below, I named the composition (students in my classes know that I recommend always changing the default names to something meaningful). You may need to revisit your efforts at some point in the future and you are helping remind yourself what the various objects are in your project. I set the width and height (I also unchecked the “lock aspect ratio” box) and frame rate. I went with the default of square pixels (the other choices seem more appropriate for media other than an animated gif.
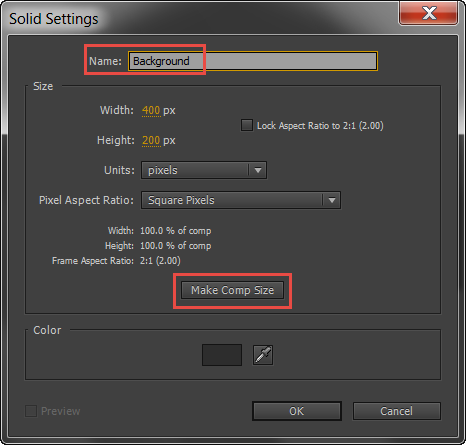
Now, we need to place the particles (ahem, snow) on something. I selected Layer > New > Solid… from the menu. I named the layer and made certain it fit the entire composition.
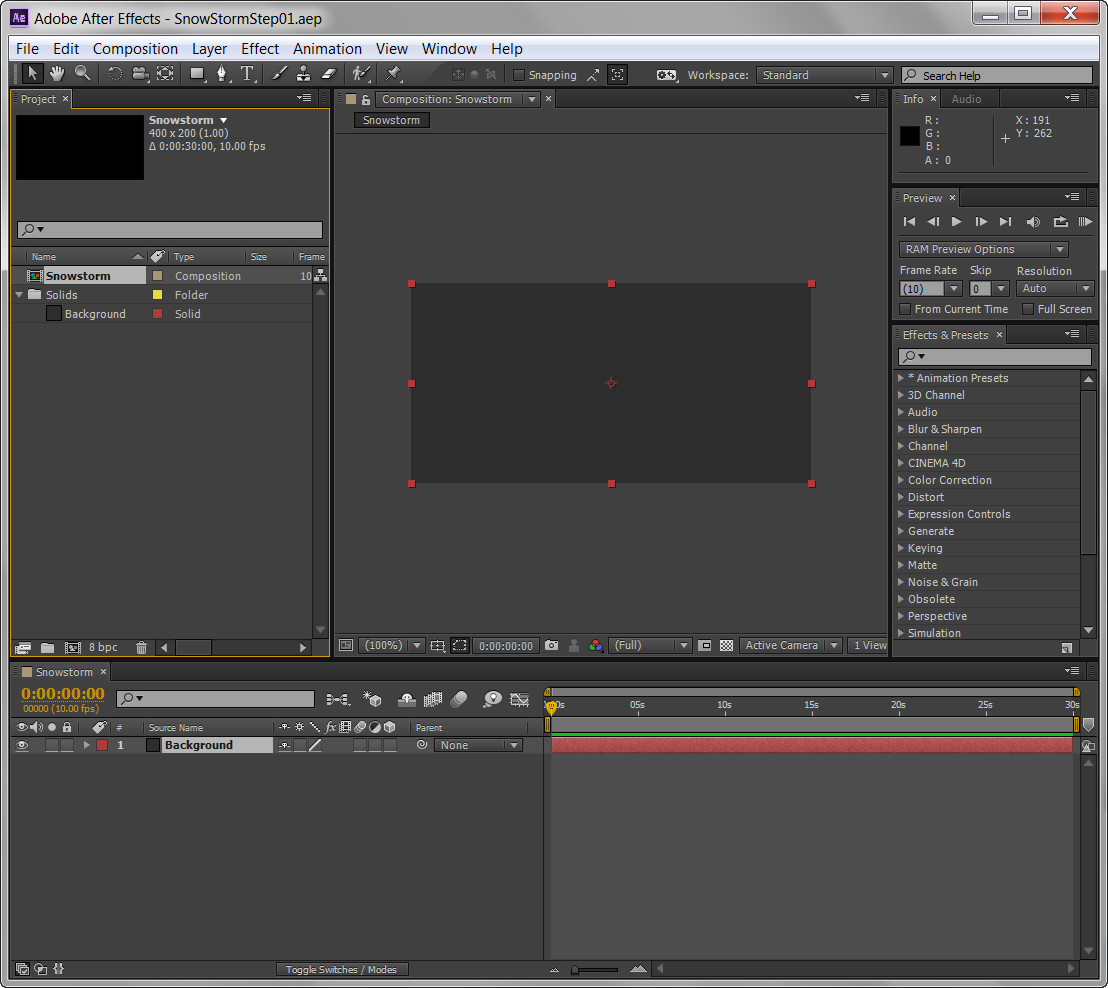
You should now see something like the screen capture below in After Effects. I created a checkpoint file (SnowStormStep01.aep) for those who want to start from this point.
With the layer selected, I next chose Effect > Simulation > CC Snowfall from the menu. The initial default effects are shown below. Of course, we can make any changes we want to these values. I encourage you to experiment with many of these values to see the changes to the snowfall.
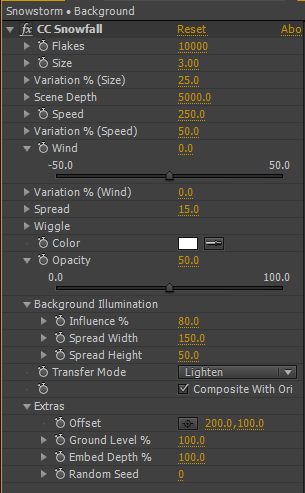
I modified a few of these to obtain the results I sought. Your mileage may (and should) vary. After tweaking the flakes, size, wind, opacity and a few other values, my animation looked like the following screen capture (this is just one point in the timeline). Ok, maybe it looks more like a sleet storm than a snowstorm. My point is to get you used to working with the tool. Obviously, you can make a lot more changes once your level of comfort with this tool improves. I created another checkpoint file for those who want to verify they have something similar. [SnowStormStep02.aep]

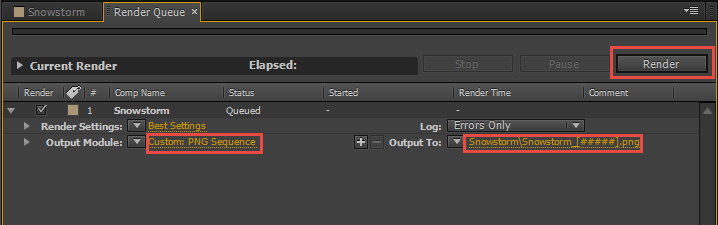
Scrub the playhead in the timeline to verify you have the desired effect (in my case, I was looking to create a snow storm at night as I watched from a window with limited light outside). Once you are satisfied, you need to render the composition. From the menu, select Composition > Add to Render Queue…
We next need to specify the type of output. I clicked on the word lossless and then selected PNG sequence from the selection list and then hit Ok. I numbered these steps in the screen capture below.
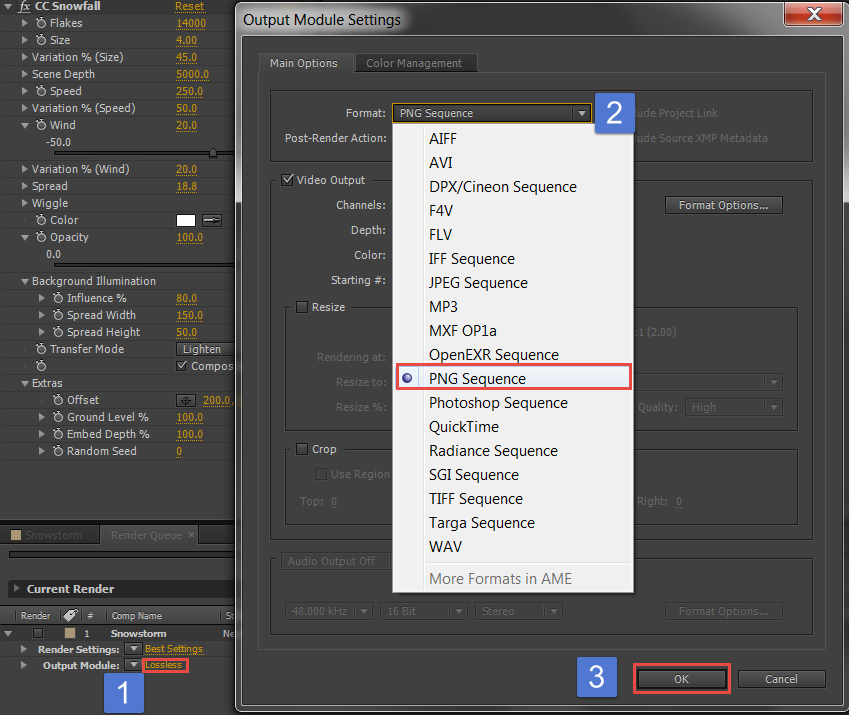
The output to… link will now show a name similar to Snowstorm_[#####].png (I chose to place these in a folder called sequence). A unique number will be applied to each image (recall there are 10 images per second). Once these changes have been made, one should click the Render button to generate the images.
Now that the sequence of images has been output, it is time to open these images in Photoshop. From the Photoshop menu, select File > Open and point to the location of the image sequence. Make certain that you check the box indicating it is an image sequence (and open the first image in the sequence).
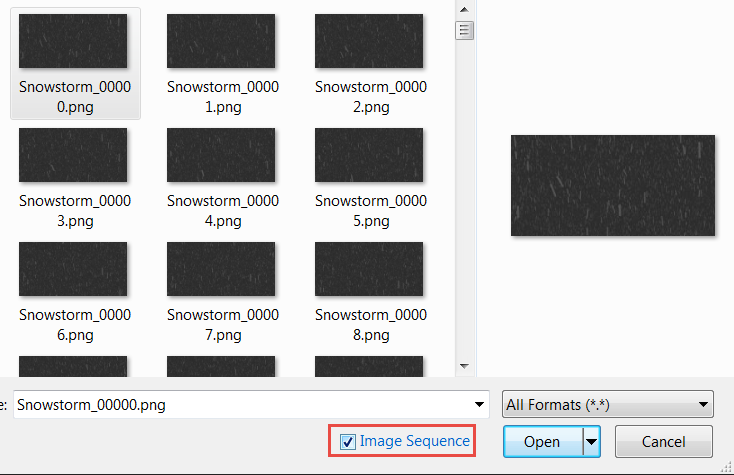
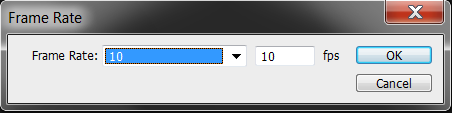
Make certain you match the frame rate with the rate you used in After Effects (in this case, 10 frames per second).
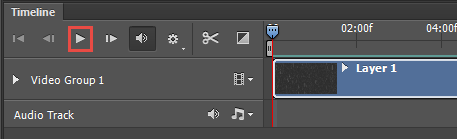
If everything imported successfully, you should see the sequence in the timeline. You should be able to view the animation by clicking on the Play icon.
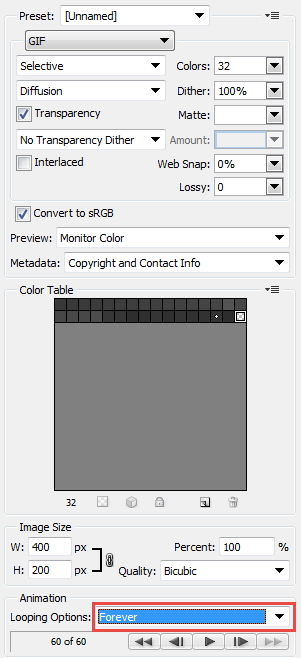
Next, select File > Save for Web… and make certain the output is set to gif. Also set the loop value to forever. I chose to only output the first few seconds of this animation (but it will loop anyway).
The resulting animated gif is shown below. Yes, we can also optimize the animation and make a number of improvements. That would be the subject of other weblog posts. I just wanted readers to see how one could create a snowstorm in After Effects and turn it into an animated gif. As always, I am interested in your comments. I encourage you to review the lynda.com lesson by Tom Green mentioned above as it greatly expands on this overview.

If you wish to examine the actual files, I provide a zip archive which contains the animated gif, the PSD, the PNG sequence, and the AE files. Simply extract the contents and modify. By the way, this is a loop – can you tell where the last frame ends and the first frame starts again?
Hi Mark,
Thank you so much. Just did my first GIf image from the After effects.
You just rocks
Cheers
Mark,
That was a very straight forward and informative tutorial. I watch and read many. Most of them are useful, but in the process waste a lot of my time with things I should already understand. I was quickly able to read through, sort out the things I already knew, gather new information and then create what I needed to. I love that you put red boxes around the important fields.
Thanks,
Hi Erick.
Many thanks for your kind words. It is nice to know others find my notes helpful.
Best always,
Mark
Just knocked out an animated gif for a digital signage project – thanks to this tutorial!
Excellent. It is nice to know that you found this tutorial helpful.
Best always,
Mark
This is exactly what i needed! That is, if i could get my PS to stop crashing..
It does not make gif file more than 500 frame can any one please help me I have more than 1600 png sequence file I want to convert it to GIF file?
Thanks
Hi:
I have never made one that large. Sorry I can’t be of more help.
Best always,
Mark
Really great, simple, straightforward tutorial that told me exactly what I needed to know. Thanks a lot!
Glad you found it useful.
Best always,
Mark
I like the way you explain everything, Mark. Just did my first gif file from after effect. Thank you so much.
Hi Thoni:
I am glad you found this useful.
Best always,
Mark
Hi, thanks for the excellent explanation. But I have a question, what if it says that the file is too heavy and it can’t be exported?
The gif only lasts 6 seconds.
Thank you
Hi. Although I have never encountered the error you mention, I would recommend trying to reduce the file size first (perhaps you can optimize any images you pull in to After Effects). Also, try reducing the amount of time for the animation to play. See if you then are able to save the animation.
Best always,
Mark
I’ll try it. Thank you so much.
Photoshop does not have an image sequence butong when opening anything. CS6 discontinued it?
I am using the latest version of Photoshop and I see the image sequence checkbox when I select File > Open. Perhaps I do not understand your comment?
Best always,
Mark
Thank you for this.I encountered a problem with the 500 frame limit in photoshop after I rendered from after effects. I see that you can lower the frame rate to 10 fps and itt works like a charm. Thanks again!
Glad you found this information useful.
Best always,
Mark
Just FYI for anyone wondering. You can’t make an animated gif with over 200 images. Mine was 500 🙁 Photoshop shows an error for having too many images open.
That is good to know. Personally, I have never tried anything close too those numbers.
Best always,
Mark
Very nice tutorial. I appreciate your clarity and concise procedure.
Just made a really nice gif. Thanks!
Definitely I will try this myself. Thank you for this great tip
thanks Mark it has been really useful on a professional job.