I have been asked to provide an overview of Adobe Captivate to fellow Adobe Education Trainers (and Adobe Education Leaders) this afternoon. I thought this would be a great place to include links to resources I will be discussing. I also hope to include a copy of the presentation (after it is available) for those who want to watch it. The presentation itself will be roughly 1 hour long.
Before delving into the details of the various examples (so people have a clearer understanding of what one can do with this technology), it is important to recognize some “elephants in the room.”
First – although Adobe Captivate is similar for both Mac and Windows environments, there is one major difference. In the Mac world, one can connect an iPhone or iPad via the USB connector and you can then choose “Device Demo” directly from the Captivate Create New Project screen. That option only exists for Mac. On the Windows side of the house, there is a Video Demo option (which is lacking on the Mac). This allows you to create a quick video demo (with audio narration). You can then edit the video in Captivate. Again, that option is Windows only.
Next, we live in the age of very high resolution monitors. For example, I have a Windows 10 laptop with a 4K screen. In order to take advantage of these features, you will need to modify the appropriate .ini file. If this needs to happen, you will likely see a screen message like the one below.
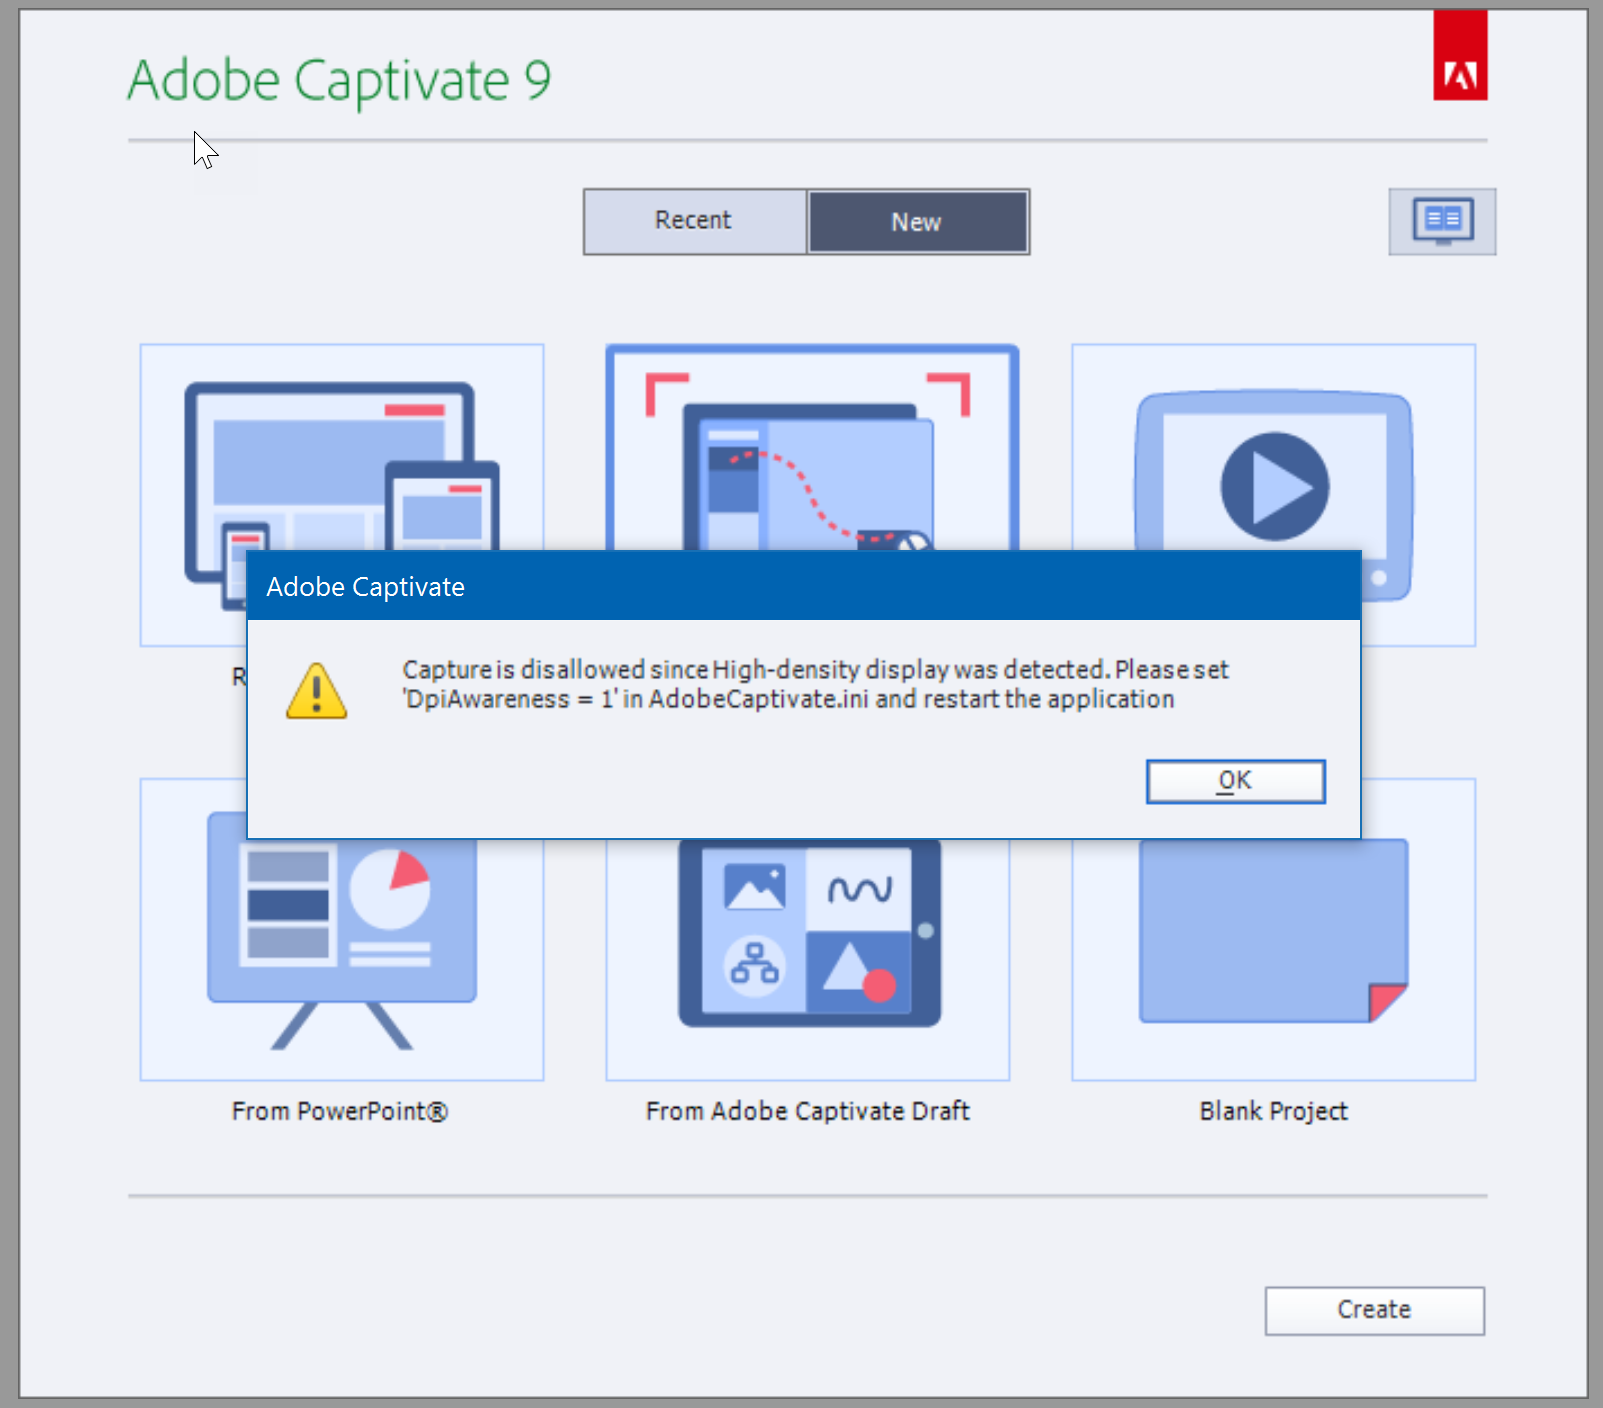
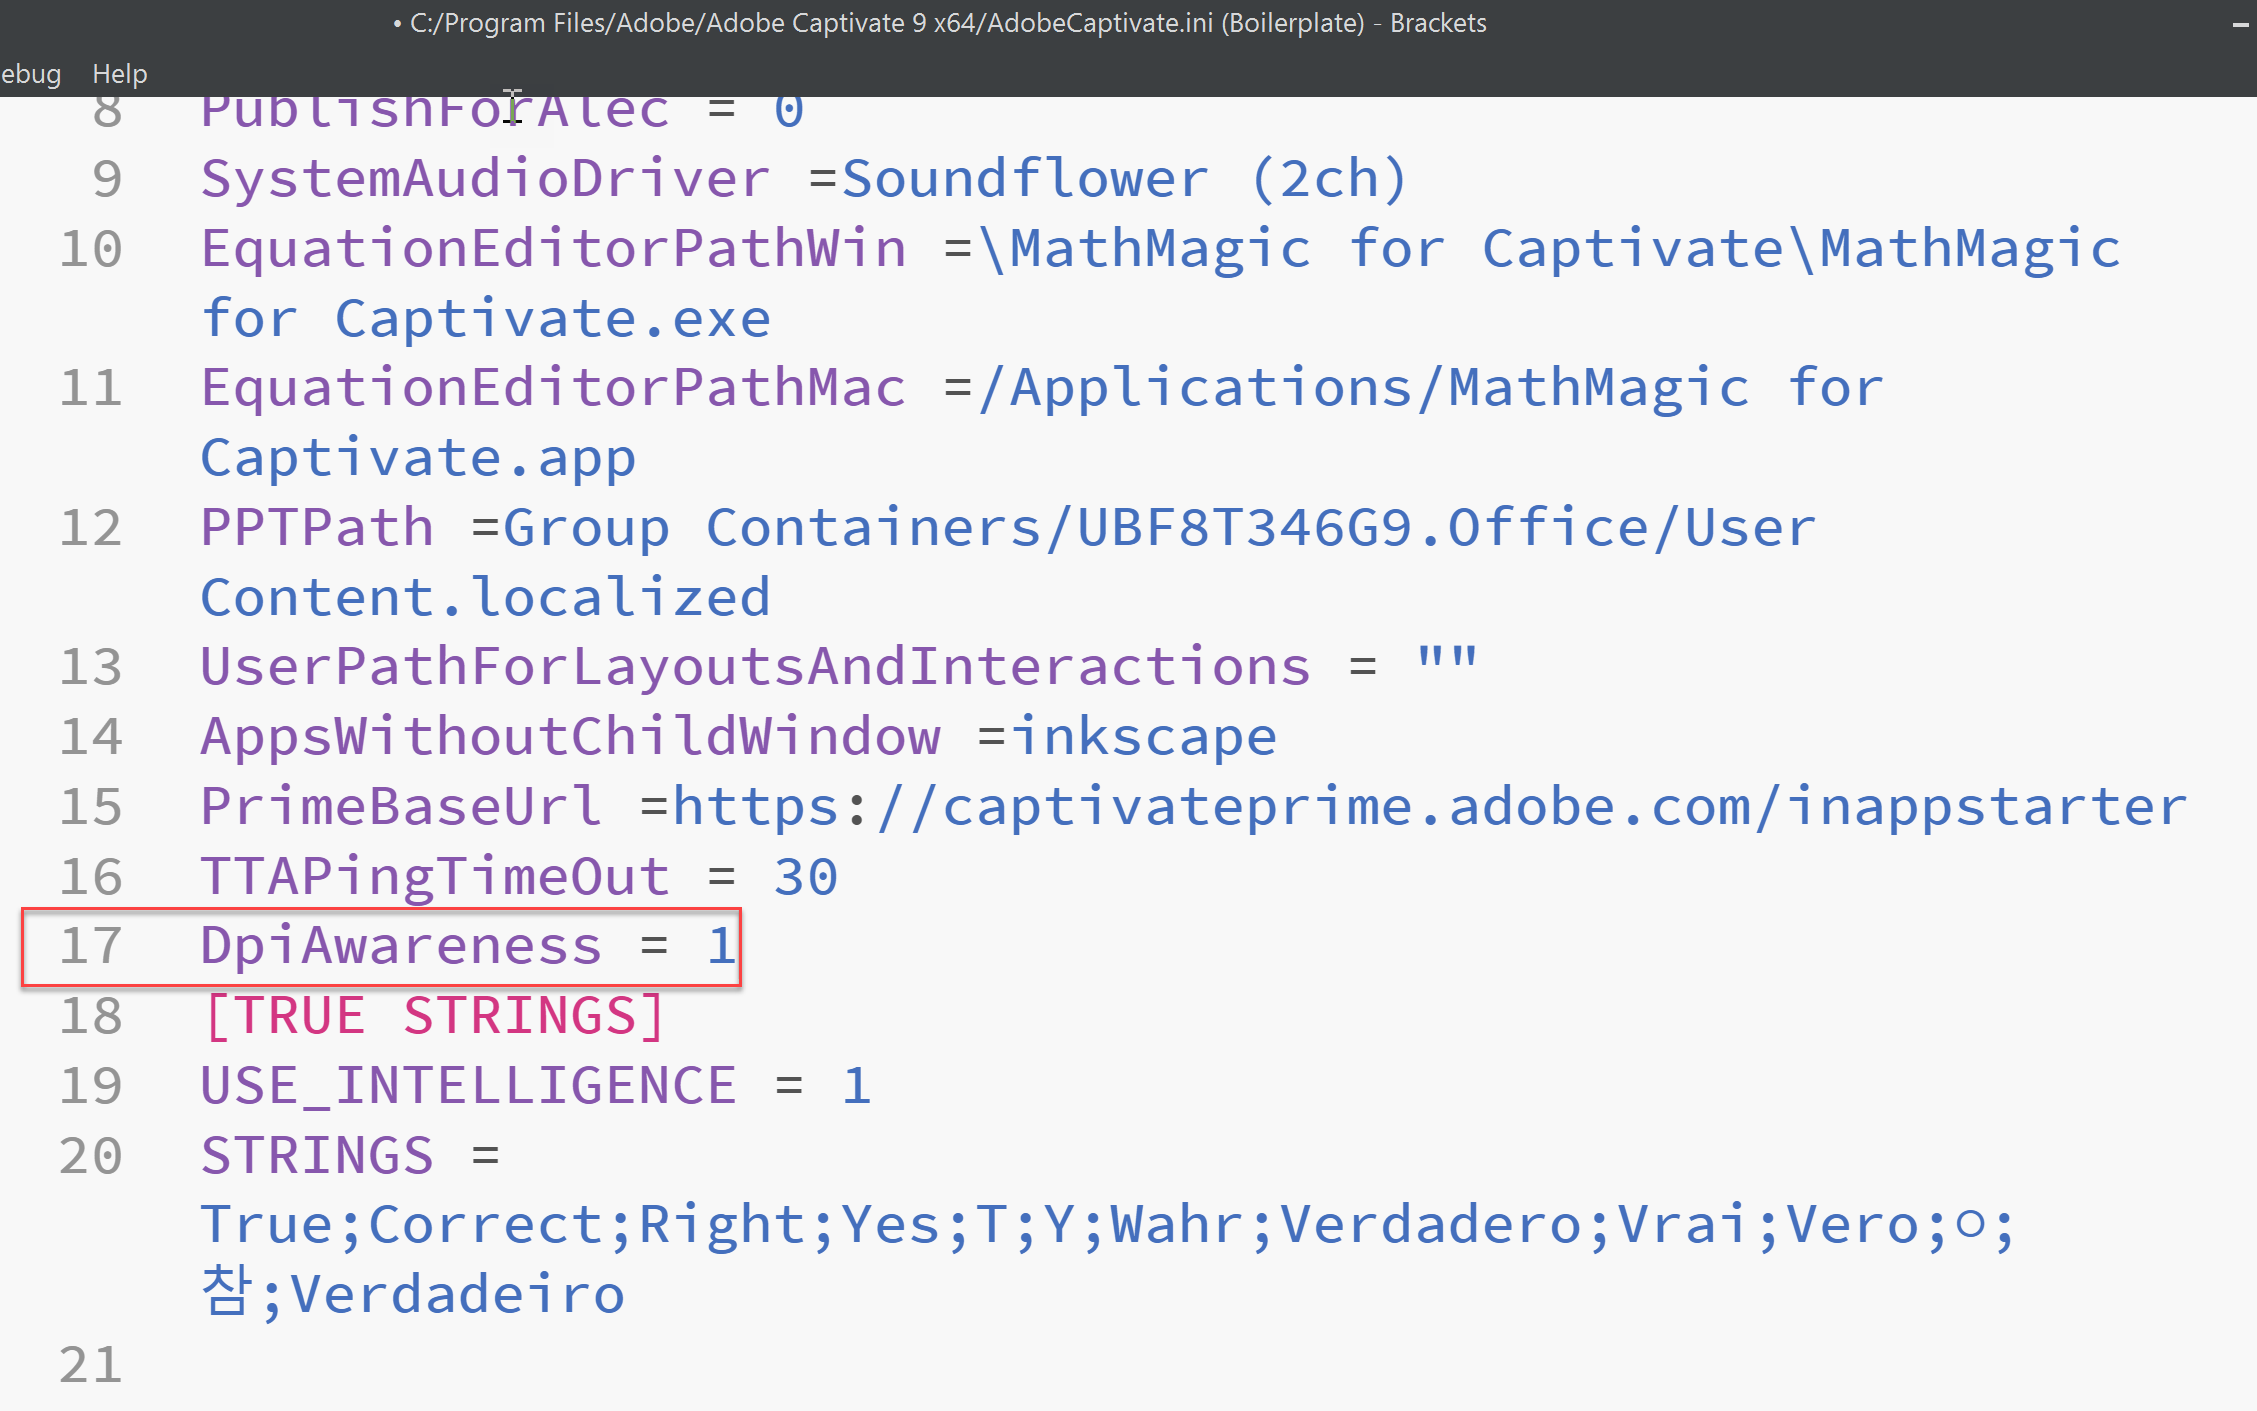
In the above case, you need to locate AdobeCaptivate.ini and make the above modification. I also included a screen capture below showing the modified line of code. It was originally set to a value of 0.
Unless you make these changes, many of the recording options (such as software simulation) will not be available on your high resolution monitor. Keep in mind (since I am using Windows in the above example), you may encounter a permissions problem in saving the AdobeCaptivate.ini file. Make certain you are able to write to the appropriate folder or your changes won’t “stick.”
Ok, now that those basics are out of the way, I plan to mention a few examples during my presentation later today.
First, I plan to demonstrate with Captivate is capable of (in the way of embedded audio, closed captioning, widgets and more). As a supporting file, I am using the CSS FontFace module I developed for the CMWEB 220 class I teach.
- CSS @fontface introduction (done in Adobe Captivate) [opens in a new browser window/ tab]
If you examine the above example, you will see the resulting HTML generated by Adobe Captivate. Be aware that nothing is being tracked (if you pursue the word search and more). I am simply using this to demonstrate many of the capabilities of Captivate.
For the second example, I delve a bit into the use of Captivate variables. It is possible to generate customized “admission tickets” for flipped classes. For example, one must view a presentation or complete a task in order to obtain a custom certificate. One could then do a screen capture or print a copy and bring it to the next class as evidence that requisite materials have been reviewed prior to class and one is prepared to contribute meaningfully to the given class activity. In this example, I am only asking you to fill in your first and last name, a subsequent screen of variable information is provided for debugging purposes. The last page is the desired certificate. Obviously, there would be a lot more associated with a specific activity in a real class example.
- Captivate “certificate of module completion” example [opens in a new browser window/ tab]
The last example I discuss is one provided by Dr. Pooja Jaisingh. The latest version of Captivate has the ability to perform geolocation. In this example (assuming you allow your device to be geolocated), a select city “fun fact” will appear. For those within Illinois viewing this, I set the default city to be the state capitol (Springfield). One can control the resolution of the geolocation (from as small as 25 meters or so to many kilometers). Obviously, I chose hundreds of kilometers for the Illinois example. Note that you do need to actively agree to geolocation. If not, a default message will appear. It still amazes me that laptops and desktops can be geolocated with some degree of accuracy (based on the ISP details).
- Captivate geolocation example [opens in a new browser window/ tab] – I recommend agreeing to geolocation in order to see the result (of course, that is ultimately up to you).
As readers may suspect, I plan to cover many additional features. I just wanted to provide a central location for all the necessary supporting files. For those who have made it this far, here is the actual presentation (it is slightly oven an hour in length).
Captivate Overview with Mark DuBois from Mark DuBois on Vimeo.
As always, I look forward to your comments.