Parallax scrolling relies on the technique where background images move slower than those in the foreground. This technique is often used to create an illusion of depth in a 2D game. An overview of the technique is provided at Wikipedia. There are several JavaScript libraries which can be used to incorporate this technique on your web pages. These include:
Yes, there are other libraries (and additional jQuery plugins). This list is not meant to be comprehensive. I noted that this feature was also added to Adobe MUSE in June, 2013. I finally found a little time to investigate and thought it would be worth demonstrating to readers of this weblog.To me, one of the strengths of tools like Adobe MUSE is that they allow me to investigate certain techniques to observe the effects without having to concentrate on the coding. I doubt that I would rely exclusively on this for a final product, but it can be very helpful for prototyping examples for students or clients. Keep in mind that these techniques should always be used in moderation and only when there is a business need to focus on a specific aspect of a product or website. I have seen too many examples where this is over used. Since there is a fair reliance on JavaScript,one can also degrade performance of a web page if there are too many examples. Keeping this in mind, let’s see what can be done with parallax scrolling using Adobe MUSE.
First, we need to have a page which is sufficiently long so we can experience scrolling. I created a new site in Adobe MUSE CC and set the page properties to a very long page.
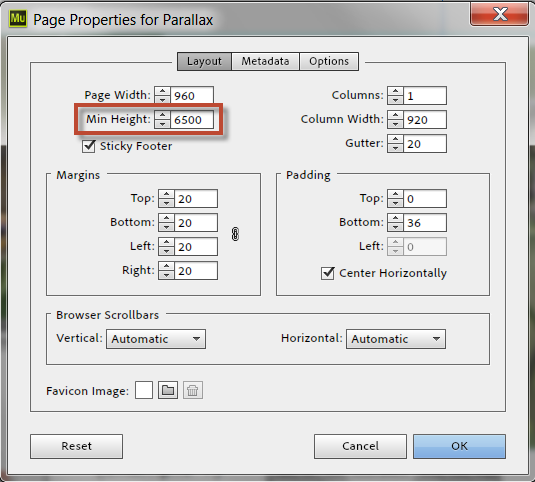
Ok, 6,500 px should be long enough. I can then place objects on the page and decide if I want to apply parallax scrolling. After placing some text, I decided to add a few images and activate scroll motion. Once I have placed the object (in this case, the image of a dragonfly), I can then activate scroll motion (parallax scrolling). The scroll effects panel is typically between the text and assets panels. I have checked the scroll motion checkbox.
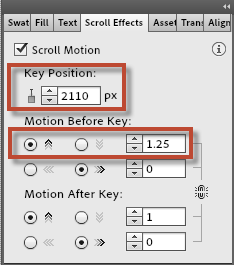
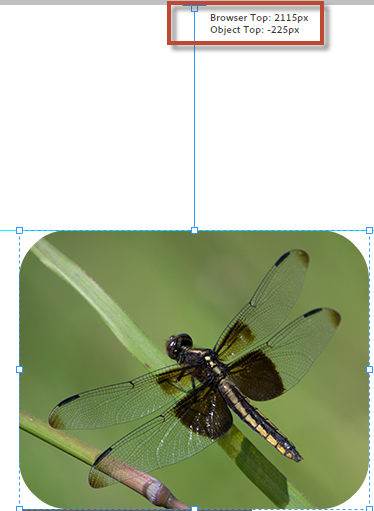
The key position is the location (x-axis) where the image is placed from the top of the browser document window. If you click on the image you will see a blue line and can change this relative starting position for the image. In the case of this dragonfly photo, I can position it to 2110 px from the top of the document. I highlighted this with a brown rectangle in the screen capture below. When the page is scrolled, and the specified position (such as 2110 px form the top in the screen capture above) is reached, the object will be placed at the same location as it was placed when in design view in MUSE. This is why I set the value to 0 for the top two objects on my example. Scrolling even a little from the top will initiate the desired effect. when the object is on the page, the motion before effect happens before the key position is reached. The motion after effect happens after the scroll has passed the key position.
Keep in mind that the effects are only visible when the page is being scrolled. Therefore, you need to scroll up and down the page to observe the effects. This is also why the initial placement of the object only has a position relative to the top of the page. It is this position that needs to be reached in order for the parallax motion effects to be observed. that took me a little while to figure out.
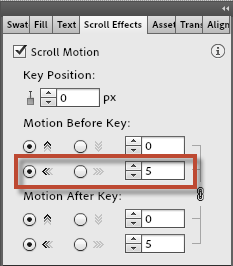
The motion values represent speeds relative to the speed of scrolling. If you scroll fast or slow, the image will move 5 times faster than you are scrolling (and to the left) based on the properties checked in the screen capture below. By selecting motion up or down or left or right, you control what is observed on the page.
If you choose a value of 0 this means the object does not move when the page is scrolled (so why would you choose scroll motion). If you set the value to 1, this means the object scrolls vertically at the same speed as other objects when you scroll through the page.
Keep in mind that the initial position of the object must be scrolled to (to activate the effect) and the effect is dependent on the speed you are scrolling. I have found that even decimal values can be helpful (for more realistic effected, consider 0.6 or 1.3 instead of the massive amounts I used in my example.
You then set the motion effect (moving left or right or up or down). By default, the motion before and after values are linked (but they do not have to be). For example, if you unlink these and set the motion after to 0 for both x and y axes, the image will remain in the final position (after the scroll motion has completed after you hit that part of the page). If you set the motion after to 0 for both x and y axes, the object will behave as if it has a CSS position of fixed (once the scroll effect has finished).
You can create a number of interesting effects using the scroll motion panel. The nice part about MUSE is that you immediately see a preview of your work so you can test. This is one of the reasons I like working with MUSE. You can experiment, then preview without ever leaving the software.
Note that I have tested the linked example page in modern versions of IE, Firefox, Chrome, Safari and Windows on both Mac and Windows 7 (as well as my iPad and various Android tablets) and observed similar effects on all. This is one of the great features on using tools like MUSE which rely on frameworks (like jQuery) that have been tested on numerous platforms.
Ok, we have now covered the fundamentals of working with parallax scrolling. Keep in mind that if you use this too much, you can generate a nauseous visitor. Like everything, it is best to use this technique in moderation.
If you are curious, I have a working example of the page I created in MUSE. You can view the page, scroll and observe the effects described. You can also download the MUSE file and assets and try to make your own changes. Please note that all photos were taken by me and can only be used for academic purposes provided that I am given credit. You make also not modify those photos without permission.
Behind the scenes. If you look at the generated HTML, you will see that the parallax scrolling effects are done using jQuery (you will need to scroll to the bottom of the HTML to see the specific jQuery code). I also see a number of generated names for IDs. If I were going to actually use this example for more than demonstration purposes, I would make some attempts to clean up the code to make it more human understandable. However, the main benefit of using MUSE is that you can concentrate on the desired content (and special effects) without ever touching code.
I am curious what others think of this example. Did it help you better understand the concept of parallax scrolling? Did it help you better understand capabilities in Adobe MUSE? I look forward to your comments.