I am giving a webinar on April 9 covering the fundamentals of Adobe MUSE for educators and needed to prepare some slides and demonstration materials. In reviewing my weblog entries, I realized that I have not included a post on this tool. I thought it might be helpful to provide some discussion as I built a website using MUSE for this webinar. All together, it took me roughly a day (8 hours) to develop the website. Full disclosure, the majority of time was spent locating suitable images (yes, I take snapshots, not photographs). The next largest chunk of time was spent deciding what to write in the way of text (and subsequent edits). The least amount of tie was spent actually developing the site. This is why I think MUSE is a tool that can be used by many with limited knowledge of HTML or CSS. The resulting sites validate as HTML5 and one can take advantage of a number of jQuery effects with the use of widgets available in MUSE. Let’s review the process.
First, one needs to know their target audience and message (what they are going to say and to whom they are going to say it). Duh? Yes, but it is best to start with the fundamentals. In this case, I am thinking of myself as an educator who is planning to send students out into the surrounding area to conduct the basics of insect identification (specifically butterflies). They may well have a desktop or laptop computer they can use to do some research (perhaps even reviewing the supplemental materials I present to them on a website). I suspect they may also have smartphones which they may take with them on their excursion. Therefore, I may well want to develop a website which can be viewed on a laptop, a tablet, and a smartphone. I haven’t mentioned the ago of the students nor the specific details as this scenario could play out for elementary students, secondary students, or post-secondary students (obviously, the content and expectations would grow with higher grade levels). Although the site is somewhat generic, it is for demonstration purposes only (and would be fleshed out for the appropriate grade level and project). If you are curious, the resulting site is available in two forms:
- The site is available as a hosted site using the Adobe Business Catalyst servers.
- The site is also available as a site hosted on one of my personal web servers.
The Business Catalyst hosted site takes advantage of several custom features (such as built in analytics and form processing). I had to add those on my own for the site I exported as HTML and placed on one of my servers. I took the approach to do both sites so one could compare these approaches. For those who are curious, I chose to handle the form processing on my site using my knowledge of PHP. I used the Piwik open source analytics package to track visitors to the site hosted on my server.
Here are the steps I followed once I had decided what to write and located the appropriate photos (ok, I had to do a little cropping, etc. on the photos).
Step 1 – When you first create a project in Muse, you need to decide what the size of the web page will be (and whether to develop for desktop, tablet, or phone first). Note the image below. Given that many people developing their first site in MUSE will likely start with a desktop version, I selected that (and went with the default width of 960 pixels).
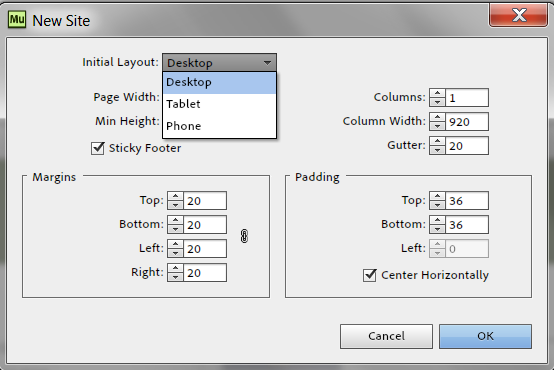
Note that margins and padding will be set to 0 if you chose either tablet or phone. Remember, there is less available screen real estate on mobile devices.
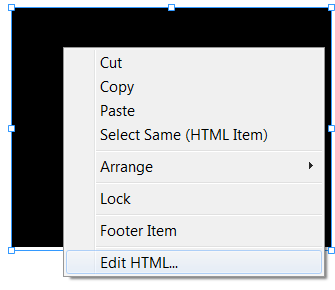
Step 2 – I next created a single master page (think of this as a template which contains items common to other pages on the site). Yes, you can have multiple master pages and apply them to parts of the site. In this case, I chose to have a single master page to reduce confusion and to have a consistent look across all pages on the site. I then created the individual pages (naming them by double clicking on their default names). You can add pages at the same level in the site map by clicking on the plus (+) symbol on either the left or right of the existing page. If you want a page to be a child of the current page, just click on the plus icon at the bottom of the given page. To see the full version of the screen capture below, just click on the image.
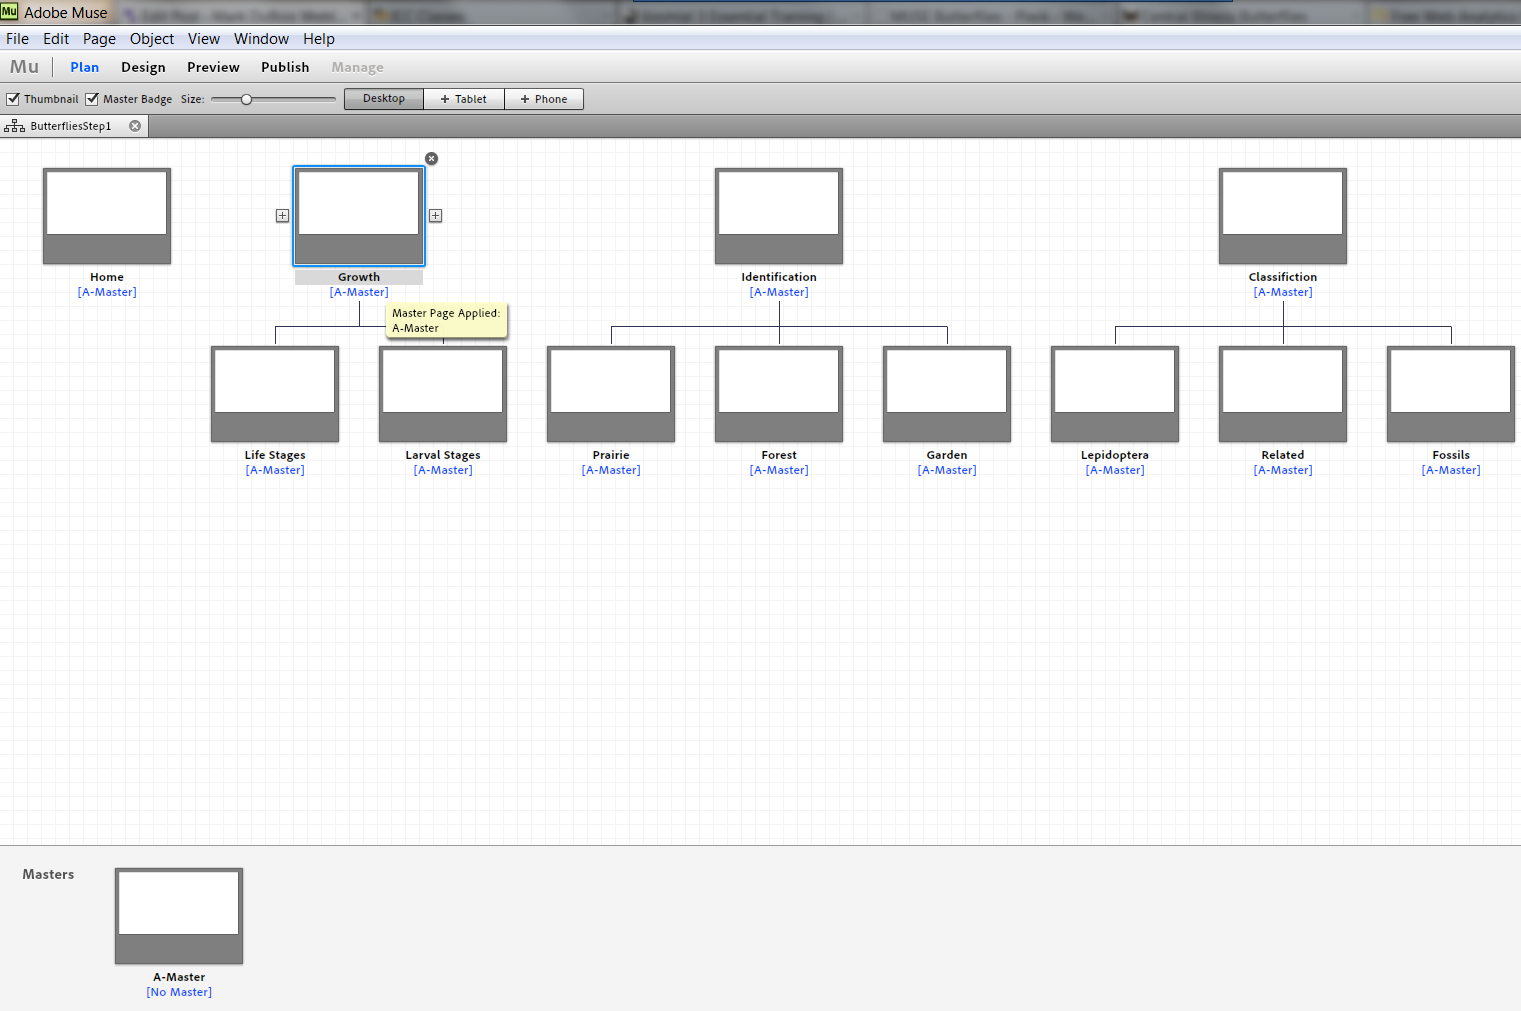
Note there is no content yet, we are just configuring the overall site. Think of the above image as a site map (we need to know what we plan to have in the way of pages and what content to place on each page). When working with MUSE, I find it easiest to identify the pages needed, configure the master page objects (which will populate all the pages linked to that master page), then add content for each page. For those who already have a copy of MUSE and want to see this checkpoint, I provide a link to the actual MUSE file for this first step (it is in a zipped archive). Note that these zip archives may also contain images. Unless otherwise notes, all images were taken by me (and are copyrighted). I do provide them for your use as long as they are used for educational purposes only and are credited with me as the photographer.
Step 3 – I open the master page and add items which will be common to all pages to the site. For example, I want to have a consistent navigation, header and footer on all pages. In the master page, I first place the banner image I created in Photoshop. Readers may be familiar with tools such as InDesign. When you use the menu in MUSE and select File > Place…, you are presented with a small version of the image which you then place in the desired location (see below). Note the guides on the left of the image for the header. One can drag these to re-size both the header and footer (as well as pacing between these items and the browser background). Since this is a background image, there is no need to place alternate text for accessibility reasons.
I also added the navigation by selecting the horizontal menu from the available widgets (see widget panel below).
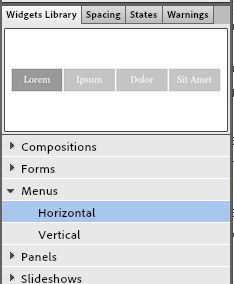
At the moment, there are two choices for menu – horizontal or vertical (we will use the latter when developing the phone version of this website). Once we have the items placed in the master file, they will ripple through all pages using that master template. I also added some text for a footer (and set appropriate links). Lastly, I wanted to style the navigation menu. Note that when you initially place the navigation on the master page, you see the following (if you look closely, you will see that all the top level pages are already listed). You will also see a “head’s up” display with information related to the entire widget. you might want to click on the image to see the details.
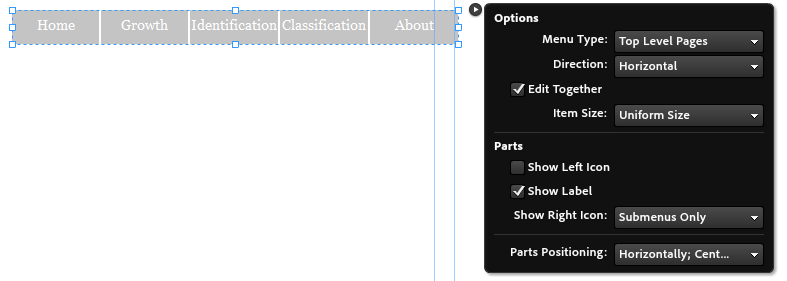
Let’s look at the head’s up display in a bit more detail. I placed a screen capture of that part of the navigation widget below.
Of all the items in the widget, the most important item (in my opinion) is the edit together checkbox. Note how it is checked. This means that any changes you make to one item in the widget (say how a given set of text displays in the navigation), all the items will have the same property. Unless I have a specific reason, I generally leave this checked. Note that you can change your mind once you have placed the widget. Just click on the widget itself, then the blue circle with the white triangle and you will bring up this display again. If you decide to change from horizontal to vertical, it is just a matter of choosing the direction from the dropdown list above. You can also choose whether to display submenus and so forth.
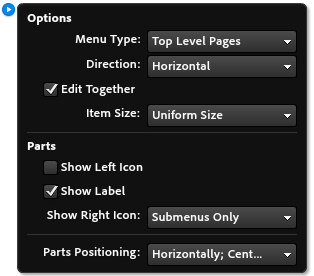
Now for another helpful hint when working with Adobe MUSE… you click once on the widget to display the properties of the entire widget. Click again and you will get the specific item. Click again and you get the text associated with that item. (see composite image below).
Why is this important to know? If you want to change the text font or background color on the navigation widget, you need to know what to check. Having the edit together option checked means that your changes will be consistent across the navigation widget.
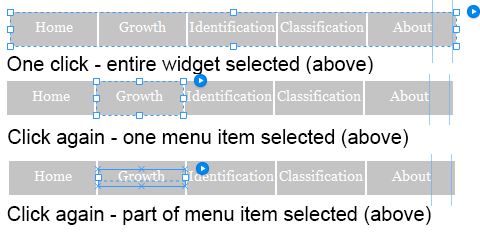
So, I personally don’t like the default background color of the navigation nor the default font. I select the individual item (such as the growth button) and begin making changes to the background fill color. I used the color picker (eye dropper tool) to select a color from one of the butterflies wings.
Since we are focused on navigation, we need to also notice there are associated states with the navigation. There is a state panel and we need to select the values appropriately.
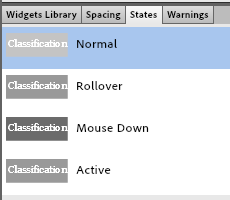
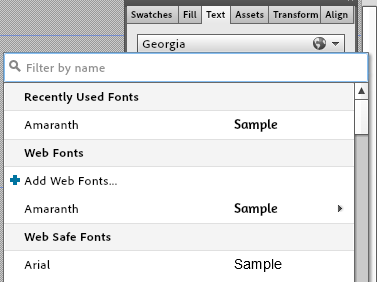
Note that the normal state is initially selected. We need to make appropriate changes to this state of the navigation widget. We then need to make corresponding changes to the rollover, mouse down and active states. In addition to the background color changes, I also wanted to change the font. The default is Georgia. I decided to add a web font (Amaranth). I clicked on the font choices and selected add a web font.
When you choose to add a web font, you are taken to the variety of choices available from Adobe (all of these are free for use on your web site developed with MUSE). You can click on the image below to enlarge it.
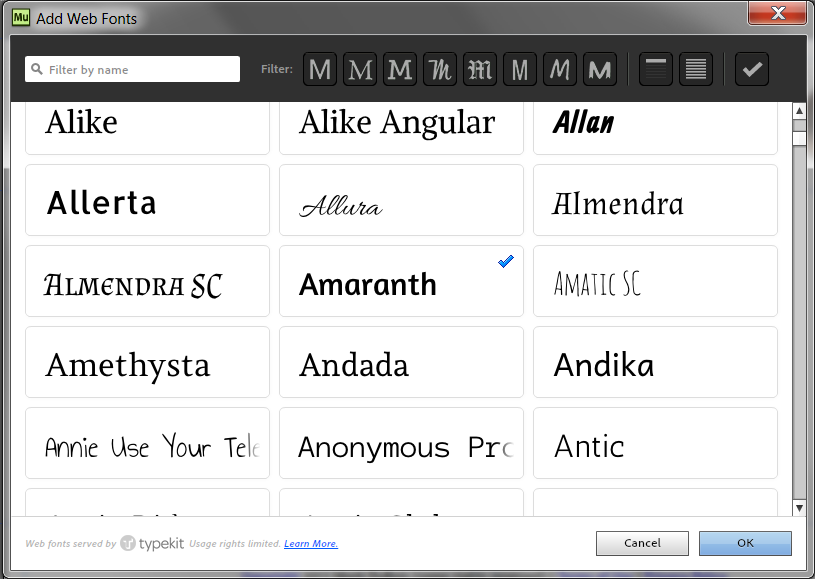
If you know a given font name, you can search for it. Otherwise, you can choose from the various styles available at the top (represented by the different styles for the letter M) or you can scroll through the entire list. I recommend using only a few fonts on a website (perhaps 2 or 3 at most). MUSE takes care of linking the font so it will appear in browsers.
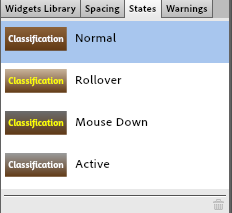
After making cchanges to the various states (background color), text color, and font, I have the results of my navigation widget shown below.
I also added a footer with some base information to the master page. In that footer, I made links to the privacy page, terms of use page, and copyright page. Simply select the desired text and choose from the dropdown list associated with the hyperlinks.
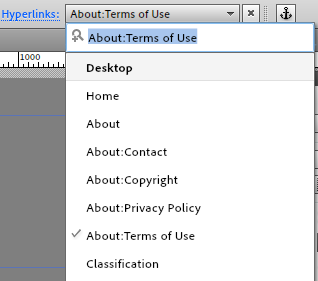
Note that you can reference external websites by entering the URL instead of selecting one of the site pages.
Now that we have the master page fleshed out, we can devote our attention to individual pages. If you have Adobe MUSE installed, I provide a link to the file where I defined the master page template, but haven’t populated the individual page content. Think of this as a step 2 checkpoint file.
Step 4 – We next need to populate the pages with desired content. Remember, we decided to build the desktop version of the site first so this is the set of pages with the most content. Most of the text is simply typed using the text tool (or you could copy text created elsewhere). I typically don’t like the added formatting that tools like MS-Word place with text so I often copy my text to NotePad++, Text Wrangler or similar to remove extra formatting before pasting it into MUSE.
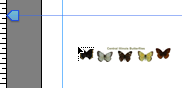
I added more widgets to selected pages. For example, on the home page, I added a slideshow widget. Just click and drag from the widget panel. I had to include a number of photos of butterflies I have taken. The widget properties are shown below.
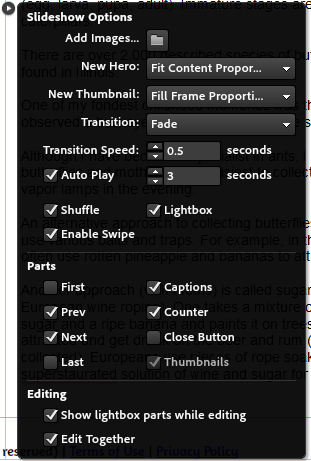
You will note that you can add images. I typically add images (it is a good idea to have them all roughly the same size before adding) as a group (select multiple from a folder). Once I have added images, I tend to delete the ones MUSE provides by default with the widget. I have found it is easiest to have the thumbnail images visible and to select a given image on the thumbnail and then delete it. Note we can include links to a first and last as well as previous and next (along with captions and a counter). As you see in the image above, there are a number of aspects of the transition and duration you can also control. Once you have a slideshow widget placed, I encourage you to experiment with various options. Remember, you can always preview a single page to see the effects of your efforts.
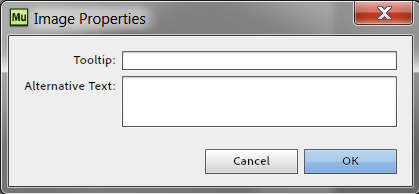
If you want to add images, you can use File > Place… to position images on the page (these will not be part of a slide show). Don’t forget to apply appropriate information for screen readers. At a minimum, I recommend always including alternate text on the images (unless there is a specific reason not to). Obviously in the screen capture below, I have not yet included either a tool tip (which would appear when you move your cursor over the image), nor alternate text (which would be read by screen readers for those who could not see the page).
In addition to placing images and slide shows, one may also want to include video on a page. It is easiest if this video is hosted on a streaming site (like YouTube). Once you have located the desired video, choose share and embed (note the screen capture below. I also set the custom size to match the original size of the video.
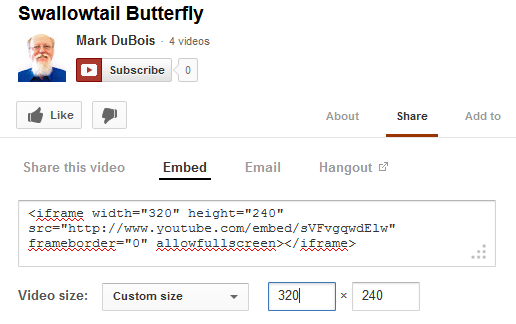
Once you have the desired sharing options, click the HMTL code <iframe… above and copy it. Return to MUSE and paste the code on the page. You can then move the resulting block of HTML as needed.You can also right click on the embedded HTML and edit it as needed. Note that when working in MUSE, you will only see a black box. You need to preview the page to actually watch the video play.
A word of caution, if you want your web pages to validate (using the W3C HTML validator), you may discover that some embedded code will cause problems. This is not a big deal, but you should be aware of it.
I also added a contact form. This is another widget one can place on a page. The screen capture is below. You may need to click on the image to enlarge it.
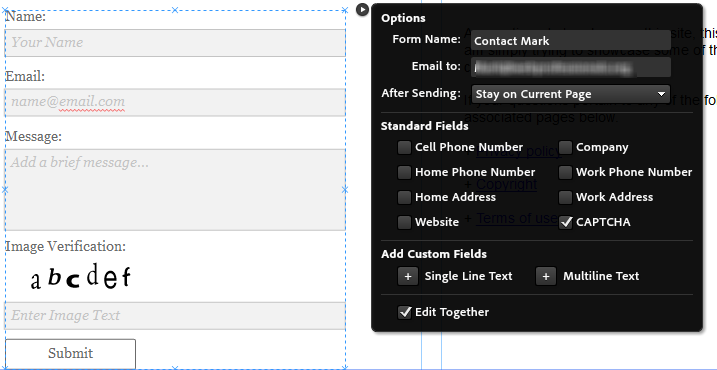
There are some issues with certain widgets (such as a contact form). If you plan to host your website at the Adobe Business Catalyst site (perhaps as a subdomain such as butterflies.businesscatalyst.com), the contact form will work flawlessly. This includes features such as the Captcha requirement. Should you decide to host your site elsewhere, you will be responsible for writing all the necessary code to make the form work properly on the server you choose. For those reading this who are not well versed in PHP or C# or similar server side scripting languages, I strongly recommend placing your code on the Business Catalyst site. You can have up to 5 subdomains as part of your Creative Cloud license.
We have now populated our pages with content and included necessary external links. If you want a copy of the work to this point, I include a link to the MUSE file (think of this as checkpoint file 3).
Step 5 – at this point, you should have previewed various pages and made the decision that your content is appropriate for the desktop. We next need to focus on the mobile versions of the site. Here is where we face an issue with the content. Since mobile devices (particularly smartphones) have much more limited screen real estate and are often subject to more costly data transfer plans, we need to decide what information is really needed for mobile devices (and adjust our content accordingly). While MUSE handles which content is displayed on which device type, we still need to copy the content form our desktop version. If you are using MUSE, you will note we can work with both tablets and phones. The plus (+) symbol below indicates we have not filled either tablet or phone with content.

If we click on either tablet or phone (screen capture above), we will be presented with the following choices:
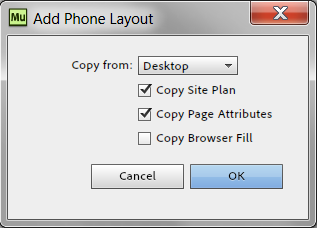
The default value to copy form is none. I changed that to Desktop. Note that we can copy the site plan (all the named pages, but no content) and the page attributes (such as their name). We could also copy the browser fill. When you click OK, you will be presented with a blank layout (much like we had for the desktop version when we started this project.
I first create a tablet layout. This is the screen we see. Note the tablet tab is highlighted, but there is no content (not even on the master page/ template). Click on the image to enlarge it.

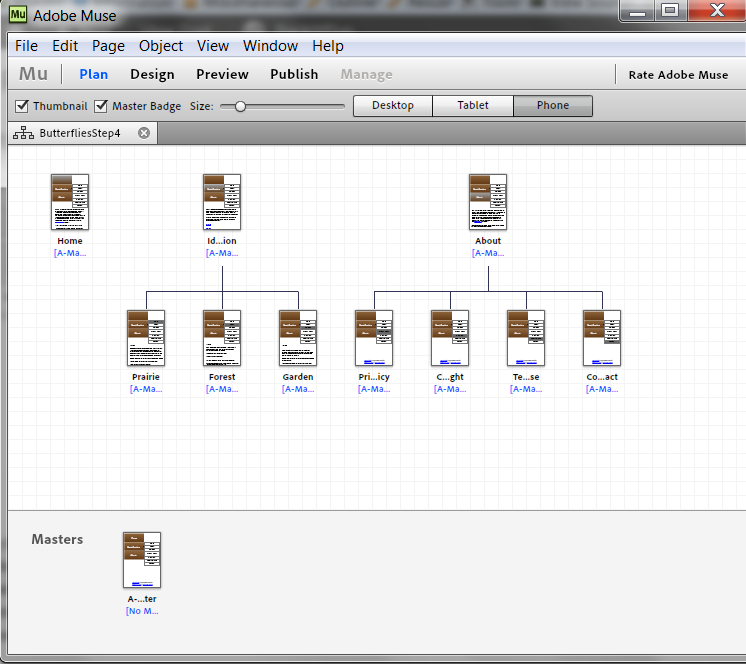
Once we have this defined, we can focus on what we need to copy. We click on the desktop tab, open a given page in MUSE, select all (Ctrl+a or Cmd+a) or a part of the content and copy it. We return to the corresponding page on the tablet and paste. We may need to modify pages given the more restricted screen real estate. In fact, I changed the navigation widget to a vertical version for the phone as there was simply not enough room for the horizontal version to display (and allow room for one to tap). I also removed the Captcha requirement form the contact form. Given there may be limited bandwidth available (due to data plans on cellular networks), I also removed the number of pages in the phone version. My intent was just to focus on those pages one might need to identify butterflies outside. A screen capture of the phone pages is shown below. You may need to click on the image to enlarge it.
The above choices are those I made for the intended audience of this site. You may decide that you need to include all the pages in your phone or tablet version of your website. By this point, we have now created a desktop version of our website, copied selected information (and perhaps rearranged it) to the tablet and phone versions of the site. If you are following along in MUSE, you may want to refer to this MUSE checkpoint file (think of it as checkpoint 4 of our work). Don’t forget to investigate the desktop, tablet, and phone tabs. Again, I recommend previewing all versions. I have found it helpful to also include links to the phone and tablet and desktop versions on the corresponding sites.
Step 6 – we now need to publish the site. you have two choices: you can either make this a site at Adobe Business Catalyst or you can export the files and send them (via FTP or sFTP or another means) to the server of your choice. Let’s examine the first option. From the available choices below, we select Publish.
We are then presented with some choices. I have twirled down the various options so you can examine them.
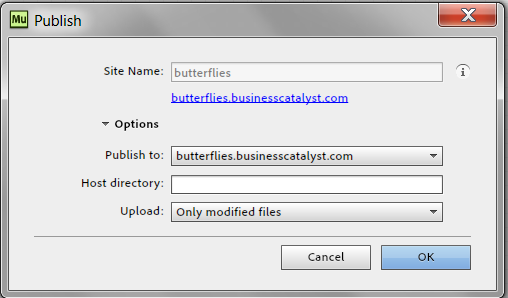
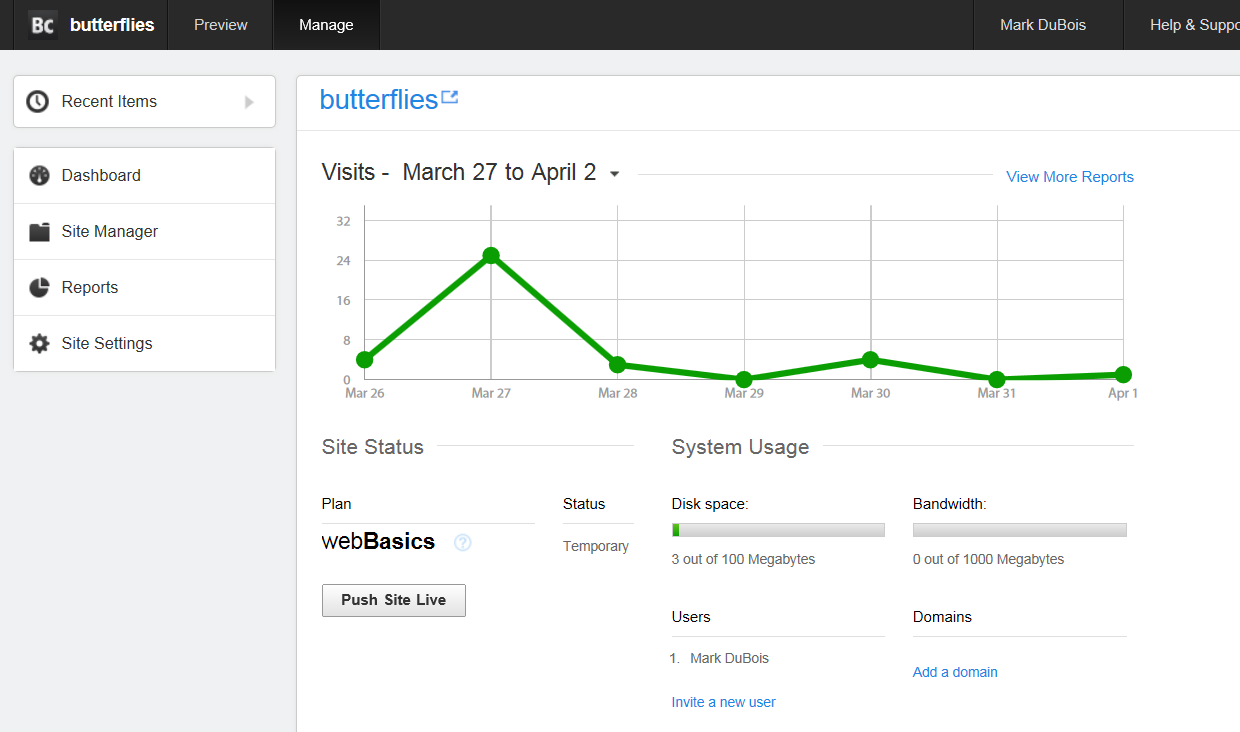
Note that I decided to name the site butterflies (I know, clever, huh). You can see the URL it will be published to (you can always change this later with the Manage choice after your site has been published). Since I have already uploaded the files, I am prompted to only upload changed files at this point – you would be able to upload everything initially. I click OK and the files are transferred. I could then open a browser of my choice and examine the results. [Yes, the link to the example site will open in a new browser window/ tab.] One could then notify their students that the site is available. If you later wanted to see activity on the site, you select the Manage option within Adobe MUSE. An example of the dashboard for the butterfly site is shown below. As before, click on the image to enlarge it. The activity is pretty low since I haven’t been actively promoting the site. Obviously there are many other reports you can examine.
That is it. You now have a functioning site and can modify it as you want (or as you need to change the class materials or lessons). you can also push the site live and obtain a domain name (that costs). you have lots of capabilities on this Business Catalyst site.
But, what if you want to have this site hosted on your own server? You take a different approach. Instead of the Publish route, you select File > Export as HTML… from the menu. You will next see a dialog box like the one below.
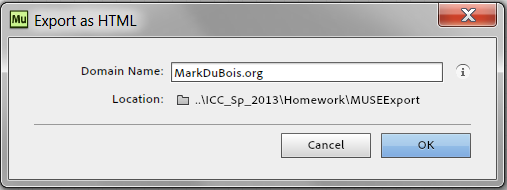
You need to supply the domain name (as this is used for the TypeKit fonts MUSE employs as well as the sitemap information for search engine optimization). You specify the local folder where you want to place the exported HTML, CSS, and related files. You will then need to copy all these files to the appropriate location on your server. You will also need to include your own code to handle the contact form information. I used PHP for mine. I also decided to use the Piwik analytics (open source) as I like to track who is viewing what. This is beyoned the scope of our present discussion, but you would need to be aware of these modifications in the event you decide to host elsewhere. If you want to see what the site looks like on another server, you can examine this site. [This link also opens in a new browser window/ tab].
Ok, you now have a function site (either way). The majority o the time I spent developing this site was devoted to selecting images and deciding what the text wording should be. That is the main strength of MUSE. You can create sites which will be valid HTML5 sites and which adhere to established wweb standards (best practices) with a minimal understanding of HTML or CSS.
There are some things I hope to see in future versions of MUSE (it is a very early release after all). For example, there is presently no way to add bulleted lists to your pages. There are some work arounds, but they are a bit contrived. I anticipate that there will be many features added as this product evolves.
I look forward to your comments (I do have to approve them due to the volume of spam received these days).
For those who would like to listen to a recording of my webinar, I provide this link.
Best,
Mark
I like Muse until I came across the BC restriction on forms. Since I’ve using DW for 12 years I thought I could develop a reasonable work-around, but then I had to ask myself, Why Bother?
To me the subscription service is just a write off so I have no complaints about that, but until Adobe offers the ability to easily incorporate a non-BC form Muse is dead, and I’ll never use BC.
Do pas this on.
Mike
I agree that one must modify the generated code to handle placement of form processing on sites hosted outside of Business Catalyst. If one if familiar with PHP, it is not that difficult. However, it does defeat the purpose of not needing to know code when working with MUSE. Obviously, this is a show stopper for you. It isn’t for me. I am curious what others reading this post think? Is this lack of functionality outside of Business Catalyst hosting a major issue? I look forward to additional comments.
Best,
Mark
there is One simple thing that it seems muse cannot do.It is frustrating. Perhaps you know how.
I want to be able to click on an image or a link and have a slideshow pop up in a window over it.
If you know how please let me know.
Hi Karen:
There are times when one needs to add a bit of HTML to a web page. This is the case when you want a specific behavior.
On the menu, select Object > Insert HTML.
This assumes you have some knowledge of HTML. If that is not the case, I recommend placing a note in the Muse discussion forum – http://forums.adobe.com/community/muse
Hope that helps a bit.
Best always,
Mark
Hi Mark,
I have built our site through Muse, and it is looking pretty good for my first time, however when i want to access and edit the content through BC when I am away from my main computer I seem to not be able to…
Is it possible to transfer my MUSE content so my business partner can edit and change things without me having to do it from my computer?
Cheers
Hi Robbie:
You should be able to login to your account from any computer using your Adobe credentials. I typically host my sites on my own servers so I don’t run into the problem you describe. You can export your site and install it on a server of yours. If you are getting a login error message when you try to access the BC site, I would suspect that you would need to contact Adobe.
Best always,
Mark
I am an escaped software developer – recently run off from corporate America, and starting to design websites for the general public. My experience is not with PHP, but almost every other development language used in enterprise wide web development. For me, Muse is a great way to save time so that I can concentrate on design, and I am confident that I can code whatever I need. My challenge is in fitting together everything in an open source environment. I have subscribed to the CC, and am happily plugging away at my new site, but I don’t quite to know where to look for some things…. For instance, I’d like to have a widget for customers to upload files for printing services I offer. ???
There is a MUSE exchange – http://muse.adobe.com/exchange. I don’t know if that would help with the widgets you seek?
Best always,
Mark
I’m in the process of creating a new website but need to have current Flash code, which I converted to HTML5 in Captivate, embedded in the site so that it maintains is interactivity.
So far the best I have been able to get with the help of Adobe is have a white page show the content but in the process loose the layout of the webiste. How do I encode the HTML5 that Captivate processes and embed it on various pages for different codes so I can keep the design that I’m creating in Muse working?
Make certain you are using Captivate interactions (not widgets). The former are HTML5 compatible. Make certain your output is HTML5. View the resulting Captivate page by itself and confirm that there is only HTML5 and that it displays as you desire. Then, include the resulting code in your MUSE project. That is the best I can suggest at the moment.
Best always,
Mark
Anyone knows the to make the menu bar to show up and being linked on all pages? I am so struggling to find, probably is something to do with the business catalyst…but when I publish my sites does not show up more then one site and the menu bar (horizontal) does not show up either…I can`t find how to link them together, there is no tutorial displayed anywhere about. thanks
I recommend placing the menu widget in the master page. This should automatically show up on all pages using that file. Hope this helps a bit.
Best always,
Mark
thanks for the post. adobe muse are really amazing software.
Here is a resource for Adobe Muse I run into. Lots of free templates and widget http://www.musefree.com
Hi Mark,
I’m new with adobe Muse and BC. I have just uploaded my 1st portfolio website through BC yesterday after final check. But still I found something that I need to change. I have tried using the in browser editing but would not let me do it. I tried editing it with Muse and publidhed it again with BC but when I click review on BC, my live website do not show the changes I made, save and published. Can you give me an advice on how to go around this issue?
Thanks,
Fred
Hi Fred:
It is possible something is cached in your browser. I recommend purging the cache as a first step. Depending on your browser, hit either shift+F5 or ctrl+F5 (depending on the browser). I make the assumption you are using Windows. If using a Mac, take a similar approach to purge all files cached in the browser. Let me know if that works.
Best always,
Mark
Is there any way to have information tracked in muse.I am putting together a website for the company where I work. We are housing pdfs for benefits for companies we deal with. My boss wanted it password protected I figured that out and now he wants to be able to tell our clients if an employee went to the website.I found code to make it required to give name and email but how to I RETAIN THAT INFORMATION? please email me and I will give you the code.
Hi Shelly:
I am not aware of any approach to do this in MUSE directly. One could use a tool like Google Analytics or Piwik (alternative) to track where the visits to the site are coming from. That is about the best I can come up with at the moment.
Best always,
Mark