In my simple view of the world, it should be relatively easy to take a screen capture of what I see on a smart phone or tablet. Why would I want to? I often need to show students what a given environment looks like. Using a document camera or some other device to externally capture the image is lame at best. I want to do this as natively as possible. With a RIM PlayBook, I hold both the volume up and volume down keys at the same time and… presto… I have a screen capture. In the Android world, things are not quite as easy. This seems to be a feature of the firmware. Some devices (like my Samsung Galaxy Tab 10.1) have this as an option. Simply touch the appropriate spot and you have a screen capture.
When I received my Amazon Kindle Fire a couple of days ago, I thought it would be relatively easy to do the same. After all, with the new Silk web browser, I would certainly want to share images of websites with my students. Boy, was I mistaken as to how easy this is. [Note, I did discover in some forums that this is a future possibility in the next version of the Kindle Fire OS. My fingers are crossed that those responsible make this a feature.] In the event others want to do the same, I offer the following instructions. I am using Windows 7 (64-bit). Your mileage will vary. FYI – elapsed time to get this working was between 2 and 3 hours. Hopefully the notes below will lessen your efforts. All links will open in a new window. You can also click on any image to see the full sized view.
Step 1 – Install the current JDK (Java Developer Kit).
Step 2 – Install the current Android SDK (Software Developer Kit)
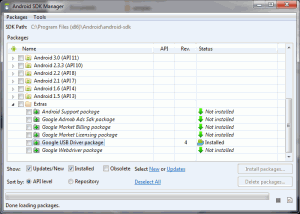
Step 3 – Navigate to the folder where you installed the Android SDK. In my case, this was C:\Program Files (x86)\Android\android-sdk. Once in that location, launch the SDKManager. You should then be able to install the necessary Google USB drivers. A screen capture of the finished result is shown below.
Step 4 – Locate the spot where these drivers were installed. In my case, they were located at C:\Program Files (x86)\Android\android-sdk\extras\google\usb_driver. Make a copy of the android_winusb.inf file (I never change original files without making a copy). Edit the android_winusb.inf file. Locate the following following lines [Google.NTx86] AND [Google.NTamd64] and place the following code underneath the [Google.NTamd64] entry. Essentially you are telling the system that this is a composite USB device and providing the appropriate vendor ID (1949). I strongly recommend copying these lines.
;Kindle Fire
%SingleAdbInterface% = USB_Install, USB\VID_1949&PID_0006
%CompositeAdbInterface% = USB_Install, USB\VID_1949&PID_0006&MI_01
Step 5 – Open the adb_usb.ini file for editing (once you have made a copy). You will find this in the %userProfile%/.android folder. At the bottom, add the following item on a single line (don’t worry about the warning message to only modify this file using the adb utility.
0x1949
Step 6 – Connect your Kindle Fire. Make certain you have set your device to install applications from unknown sources. Note that the Kindle Fire seems to be running a modified version of Dalvik so you do not have the option to enable USB debugging (which you would have on other Android devices). You will likely get an error message indicating that the device drivers did not install properly.
Step 7 – open Windows Device Manager and locate your device. Select “update the driver” and point to the location of the drivers you installed. In my case – C:\Program Files (x86)\Android\android-sdk\extras\google\usb_driver. You may need to refresh the device list once finished, but your Kindle should now be recognized. I included a screen capture below showing that the device is recognized as a Kindle.
Step 8 – Run the adb utility at the command shell to confirm you have a device recognized. Note – you might want to add some of these paths to your environment variables unless you enjoy typing. I used the command adb devices to see the following.
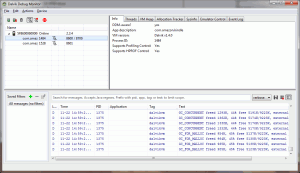
Step 9 – Navigate to your Android SDK folder C:\Program Files (x86)\Android\android-sdk\tools and start the ddms.bat utility. You should now see your Kindle Fire (and be able to do screen captures).
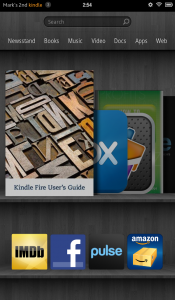
Ok, where was I? Oh yeah, what does the Kindle Fire look like. First we see the interface (shown below). I do like this launcher. Your interface controls are at the top.
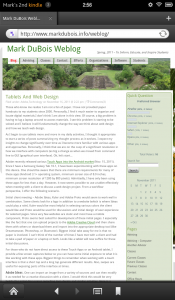
This is what the Silk browser looks like when viewing the current website.
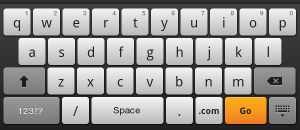
Lastly, here is what the touch keyboard looks like.
I would be curious what your experiences have been with the Kindle Fire. I may well post additional comments in the future. Just thought that my experiences at obtaining screen captures was worth a post.




I turns out that this method doesn’t work on the KindleFire HD. When I plug the KindleFire HD into the usb port the device does not appear. If you find out how to capture screenshots on the HD please let me know.
Hi Earl:
Many thanks for the feedback. Unfortunately, I don’t have the device in question so I am at a loss as to how to advise.
Best,
Mark